Setting Up a 3-Node MongoDB Replica Set Cluster with Docker Compose
Introduction
In this blog post, I'll walk you through setting up a 3-node MongoDB replica set cluster using Docker Compose. This guide will assume you're familiar with basic Docker concepts such as Docker Compose, volumes, networks, and health checks, as well as MongoDB concepts like replica sets. So, if you're ready, let's dive in!
What is a MongoDB Replica Set?

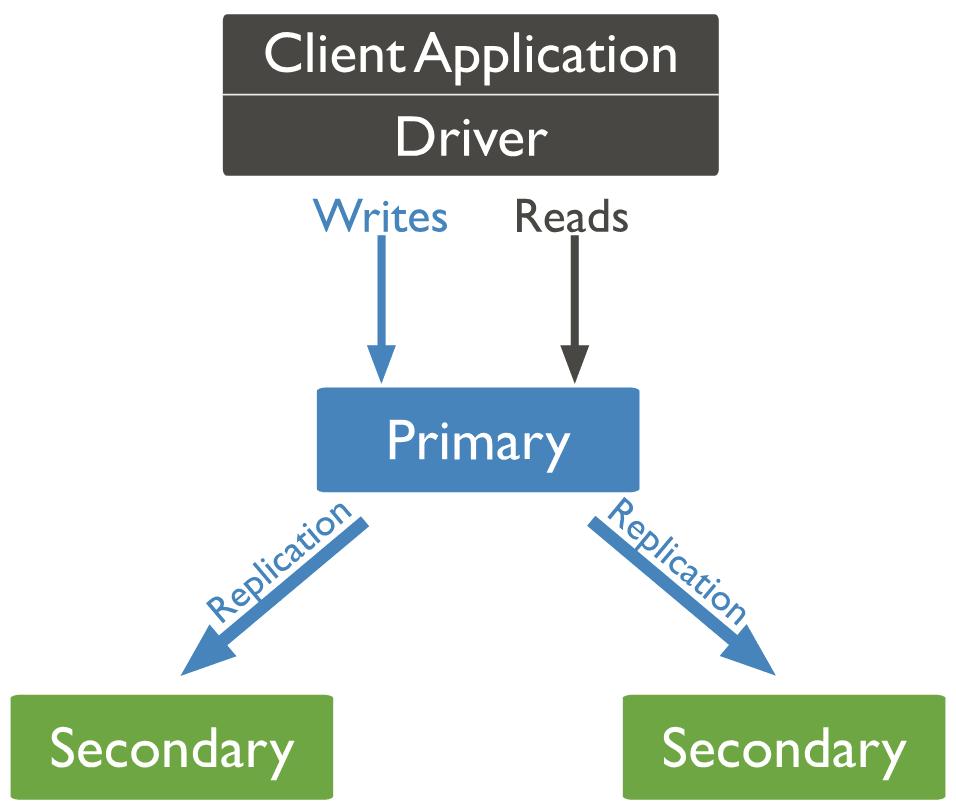
A mongoDB replica set is a group of mongoDB instances that host the same data set. In a replica set, one node is the primary node that receives all write operations. All other nodes, known as secondary nodes, apply operations from the primary so that they have the same data set.
MongoDB replica sets offer redundancy and high availability, keeping the database operational even if one or more nodes die. They replicate data across multiple nodes to ensure integrity and availability.
Why Use a MongoDB Replica Set?
1- High Availability: If the primary node fails, a secondary node can be elected as the new primary, ensuring that the database remains available.
2- Data Redundancy: Data is replicated across multiple nodes, ensuring data integrity and availability.
3- Read Scalability: Secondary nodes can serve read operations, distributing the read load across multiple nodes.
4- Automatic Failover: If the primary node fails, a secondary node is automatically elected as the new primary node.
For further reading about MongoDB replication, check out the official MongoDB documentation on replica sets.
Setting Up a 3-Node MongoDB Replica Set Cluster with Docker Compose
Prerequisites
In this guide, we'll use Docker Compose to set up a 3-node MongoDB replica set cluster. Before you start, make sure you have Docker and Docker Compose installed on your machine. If you don't have them installed, you can download them from the official Docker website.
You may also need to have a basic understanding of MongoDB and mongo shell commands. If you're new to MongoDB, you can check out the official MongoDB documentation on MongoDB CRUD Operations.
Step 1: Create a Docker Compose File
Begin by creating a docker-compose.yml file in a new directory. This file will define the services for the MongoDB
containers. We'll create:
- three services:
mongo1,mongo2, andmongo3 - a network called
mongo-clusterand - three volumes:
mongo1-data,mongo2-data, andmongo3-data
Let's dot it:
networks:
  mongo-cluster:
    driver: bridge
volumes:
  mongo1-data:
  mongo2-data:
  mongo3-data:
services:
  mongo1:
    container_name: mongo_rs0
    image: 'mongo:7.0-jammy'
    hostname: mongo1
    command:
      - '--replSet'
      - rs0
      - '--bind_ip'
      - '127.0.0.1,mongo1'
      - '--port'
      - '27017'
      - '--keyFile'
      - /etc/mongodb/pki/keyfile
    volumes:
      - 'mongo1-data:/data/db'
      - '$PWD/scripts/mongo/rs_keyfile:/etc/mongodb/pki/keyfile'
      - '$PWD/scripts/mongo/init.js:/docker-entrypoint-initdb.d/init-mongo.js'
    ports:
      - '27017:27017'
    networks:
      - mongo-cluster
    healthcheck:
      test: >-
        echo "try {rs.status()} catch(err)
        {rs.initiate({_id:'rs0',members:[{_id:0,host:'mongo1:27017',priority:1},{_id:1,host:'mongo2:27018',priority:0.5},{_id:2,host:'mongo3:27019',priority:0.5}]})}"
        | mongosh --port 27017 -u '${MONGO_ADMIN_USER:-admin}' -p
        '${MONGO_ADMIN_PASSWD:-veryStringPassword}' --authenticationDatabase
        admin --quiet
      interval: 5m
      timeout: 10s
      retries: 3
      start_period: 10s
    environment:
      MONGO_INITDB_ROOT_USERNAME: '${MONGO_ADMIN_USER:-admin}'
      MONGO_INITDB_ROOT_PASSWORD: '${MONGO_ADMIN_PASSWD:-veryStringPassword}'
      MONGO_INITDB_DATABASE: '${DB_NAME:-test}'
      DB_USERNAME: '${DB_USERNAME:-myuser}'
      DB_PASSWORD: '${DB_PASSWORD:-mypassword}'
  mongo2:
    container_name: mongo_rs1
    image: 'mongo:7.0-jammy'
    hostname: mongo2
    command:
      - '--replSet'
      - rs0
      - '--bind_ip'
      - '127.0.0.1,mongo2'
      - '--port'
      - '27018'
      - '--keyFile'
      - /etc/mongodb/pki/keyfile
    volumes:
      - 'mongo2-data:/data/db'
      - '$PWD/scripts/mongo/rs_keyfile:/etc/mongodb/pki/keyfile'
    ports:
      - '27018:27017'
    networks:
      - mongo-cluster
    environment:
      MONGO_INITDB_ROOT_USERNAME: '${MONGO_ADMIN_USER:-admin}'
      MONGO_INITDB_ROOT_PASSWORD: '${MONGO_ADMIN_PASSWD:-veryStringPassword}'
  mongo3:
    container_name: mongo_rs2
    image: 'mongo:7.0-jammy'
    hostname: mongo3
    command:
      - '--replSet'
      - rs0
      - '--bind_ip'
      - '127.0.0.1,mongo3'
      - '--port'
      - '27019'
      - '--keyFile'
      - /etc/mongodb/pki/keyfile
    volumes:
      - 'mongo3-data:/data/db'
      - '$PWD/scripts/mongo/rs_keyfile:/etc/mongodb/pki/keyfile'
    ports:
      - '27019:27017'
    networks:
      - mongo-cluster
    environment:
      MONGO_INITDB_ROOT_USERNAME: '${MONGO_ADMIN_USER:-admin}'
      MONGO_INITDB_ROOT_PASSWORD: '${MONGO_ADMIN_PASSWD:-veryStringPassword}'
Let's break down the docker-compose.yml file:
- We define a network called
mongo-clusterthat will be used by all the MongoDB containers. This ensures that the containers can communicate with each other through the hostnamesmongo1,mongo2, andmongo3. - We define three volumes:
mongo1-data,mongo2-data, andmongo3-datato persist the data for each MongoDB container. - We define three services:
mongo1,mongo2, andmongo3. Each service runs a MongoDB container with themongo:7.0-jammyimage. We specify the--replSetoption to set the replica set name tors0. We also specify the--bind_ipoption to bind the container to the hostnamesmongo1,mongo2, andmongo3. We mount the volumes to persist the data and the keyfile for authentication. We expose the ports27017,27018, and27019for the MongoDB containers. We define a health check for themongo1service to check the status of the replica set and initiate it if it's not already initiated. After the healthcheck is successful, the replica set is initiated with the primary nodemongo1and secondary nodesmongo2andmongo3. - We set the environment variables
MONGO_INITDB_ROOT_USERNAME,MONGO_INITDB_ROOT_PASSWORD,MONGO_INITDB_DATABASE,DB_USERNAME, andDB_PASSWORDfor each service to configure the MongoDB authentication. We're using interpolation to make sure the default values are used if the environment variables are not set.
Step 2: Create a Keyfile for Authentication
MongoDB uses keyfiles for internal authentication between members of the replica set. In a certain scenario where credentials are not set, we would not need it. But for the sake of this guide, we need to create a keyfile and mount it to the MongoDB containers, since we're using authentication.
To create a keyfile, run the following command:
openssl rand -base64 756 > scripts/mongo/rs_keyfile && chmod 400 scripts/mongo/rs_keyfile
This command generates a random 756-byte key and saves it to the scripts/mongo/rs_keyfile file. We then set the file
permissions to 400 to ensure that only the owner mongodb:mongodb can read and write to the file. You can read more
about keyfiles in the MongoDB documentation.
Note: the keyfile is used for internal authentication between members of the replica set. It's important to keep the keyfile secure and not expose it to unauthorized users.
Step 3: Create an Initialization Script
As I mentioned earlier, we'll set up an initial database, username and password for the MongoDB replica set. To do so we'll
use an initialization script that will be executed when the MongoDB container starts. Now, create a file called
init.js in the scripts/mongo directory with the following content:
db = db.getSiblingDB(process.env.MONGO_INITDB_DATABASE)

db.createUser({
    user: process.env.DB_USERNAME,
    pwd: process.env.DB_PASSWORD,
    roles: [{ role: 'readWrite', db: process.env.MONGO_INITDB_DATABASE }]
}, { w: 'majority', wtimeout: 5000 });
Let's break down the init.js file:
- We connect to the database specified by the
MONGO_INITDB_DATABASEenvironment variable. - We create a user specified by the
DB_USERNAMEandDB_PASSWORDenvironment variables with thereadWriterole on the database. - We set the write concern to
majoritywith a timeout of5000milliseconds. This ensures that the write operation is acknowledged by the majority of the replica set members.
This script will be executed when the MongoDB container starts, creating the initial database and user for the replica set. Note that the script part is not mandatory, and you could use hardcoded values. However, according to the section III of the 12-factor app, it's better to use environment variables to store secrets or anything that may vary between deployments.
Step 4: Start the MongoDB Replica Set Cluster
Now that we have everything set up, we can start the MongoDB replica set cluster using Docker Compose by running the following command:
docker-compose up -d
Note: The
-dflag runs the containers in detached mode, which means they will run in the background.
Step 5: Verify the MongoDB Replica Set
To verify that the MongoDB replica set is running correctly, you can use the mongo shell to connect to the primary
node and check the status of the replica set. Run the following command to connect to the primary node:
docker exec -it mongo_rs0 mongosh -u admin -p veryStringPassword --authenticationDatabase admin
Note: Replace
veryStringPasswordwith the password you set for theMONGO_INITDB_ROOT_PASSWORDenvironment variable. If you didn't set it, useveryStringPassword.
Once connected, run the following command to check the status of the replica set:
rs.status()
You should see the status of the replica set with the primary node mongo1 and the secondary nodes mongo2 and mongo3.
The output should like:
members: [
    {
      _id: 0,
      name: 'mongo1:27017',
      health: 1,
      state: 1,
      stateStr: 'PRIMARY',
      uptime: 478,
      electionTime: Timestamp({ t: 1721354075, i: 1 }),
      electionDate: ISODate('2024-07-19T01:54:35.000Z'),
        ...
    },
    {
      _id: 1,
      name: 'mongo2:27018',
      health: 1,
      state: 2,
      stateStr: 'SECONDARY',
      uptime: 471,
      syncSourceHost: 'mongo1:27017',
        ...
    },
    {
      _id: 2,
      name: 'mongo3:27019',
      health: 1,
      state: 2,
      stateStr: 'SECONDARY',
      uptime: 471,
      syncSourceHost: 'mongo1:27017',
        ...
    }
  ],
  ok: 1,
  '$clusterTime': {
    clusterTime: Timestamp({ t: 1721354536, i: 1 }),
    signature: {
      hash: Binary.createFromBase64('8KKPt/SmHkhGZDH299+yq6j5i04=', 0),
      keyId: Long('7393159456961331205')
    }
  },
Note: This is a truncated output, and it may vary depending on the version of MongoDB you're using.
Bonus: Add Mongo-Express for Web-based Administration
Let's add a web-based administration tool for MongoDB, by using mongo-express. To add mongo-express to the Docker
Compose file, add the following service definition:
mongo-express:
  container_name: mongo-express
  image: 'mongo-express:latest'
  ports:
    - '8081:8081'
  networks:
    - mongo-cluster
  environment:
    ME_CONFIG_BASICAUTH: false
    ME_CONFIG_MONGODB_ENABLE_ADMIN: false
    ME_CONFIG_MONGODB_ADMINUSERNAME: '${MONGO_ADMIN_USER:-admin}'
    ME_CONFIG_MONGODB_ADMINPASSWORD: '${MONGO_ADMIN_PASSWD:-veryStrongPassword}'
    ME_CONFIG_MONGODB_URL: >-
      mongodb://${DB_USERNAME:-myuser}:${DB_PASSWORD:-veryStringPassword}@mongo1:27017,mongo2:27018,mongo3:27019/${DB_NAME}?replicaSet=rs0
  depends_on:
    mongo1:
      condition: service_healthy
Note: The
mongo-expressservice depends on themongo1service being healthy. This ensures that the replica set is up and running before starting themongo-expressservice.
You can access mongo-express at http://localhost:8081 in your browser, and have something like this:

Note: To connect your application to the MongoDB replica set, you can use the connection string
mongodb://${DB_USERNAME}:${DB_PASSWORD}@mongo1:27017,mongo2:27018,mongo3:27019/${DB_NAME}?replicaSet=rs0. Also make sure to replace theDB_USERNAME,DB_PASSWORD, andDB_NAMEwith your application's credentials by setting the environment variables in the.envfile.
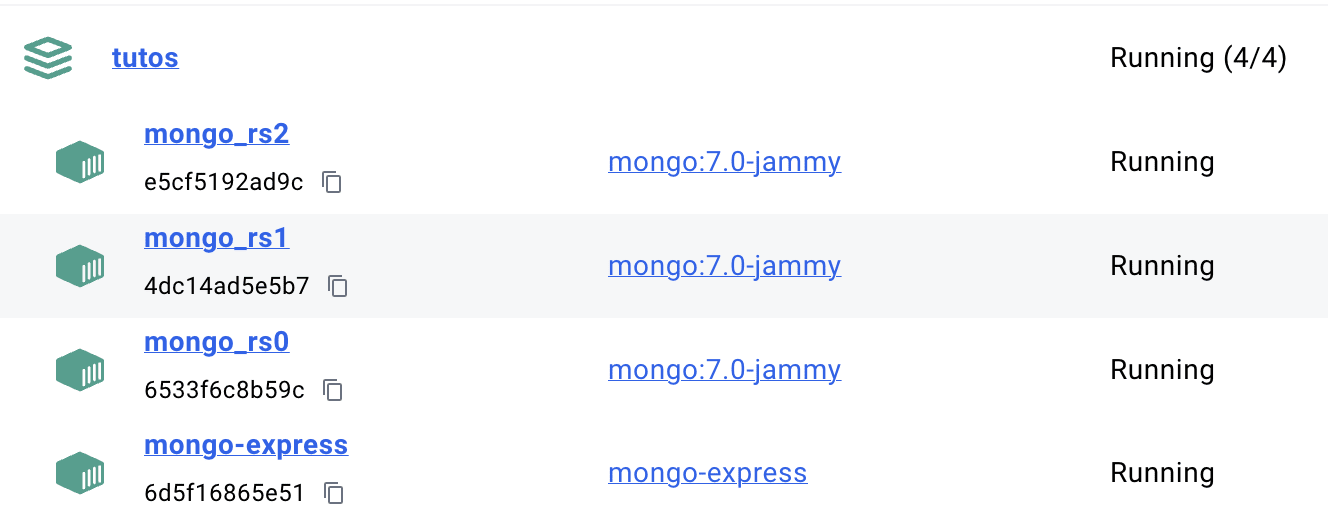
If everything is set up correctly, you should have something like this in your docker desktop:

And voilà, you have a MongoDB replica set cluster with a web-based administration tool!
Conclusion
In this article, I walked you through setting up a 3-node MongoDB replica set cluster using Docker Compose. We covered
the basics of MongoDB replica sets, the prerequisites for setting up a replica set, and the steps to create a Docker
Compose file to set up the replica set. I also showed you how to verify the replica set and add a web-based administration
tool using mongo-express. I hope this guide helps you get started with MongoDB replica sets and Docker Compose.
In a future post, I'll talk about something more important: how to back up, and restore a MongoDB database in a containerized environment. You may have heard that Docker containers are ephemeral, so it's important to have a backup strategy in place to avoid data loss. Stay tuned for that!
If you have any questions or feedback, feel free to reach out to me. Happy coding!